
This tutorials tells how rsyslog is configured to accept syslog messages over the network via UDP. No advanced topics are covered. We use CentOS 7. This is part of a rsyslog tutorial series.
Scope
We will configure the relay system to accept UDP based syslog from remote ends. We do not, however, configure any sender to connect to it. We will use LC as UDP server, just so that we get some more variety into our lab with limited systems. In our base lab scenario, this will lead to the following configuration:
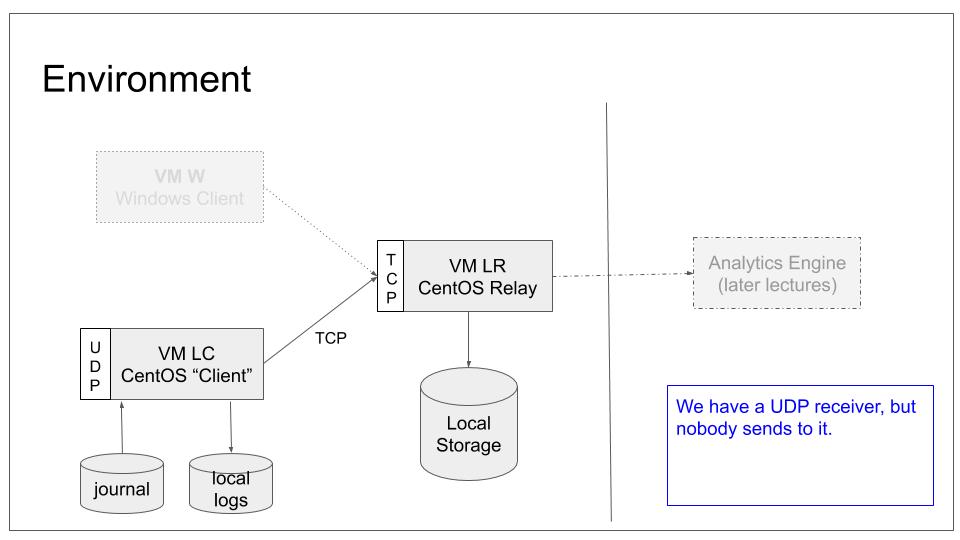
Note that we will accept incoming logs and store them into the same location as we do for local logs. Handling them different will be part of a later tutorial.
Side-note: If you think closely about syslog terms, you will notice that the word “client” for LC is not correct for this lab. The system actually is a syslog relay at the end of this tutorial. We use the term “client” to convey the intent at the end of the core tutorial series. This information is given for clarity. You can safely ignore it at this stage.
Prerequisites
You need to
- know how to start, stop and query the status of rsyslog
- find rsyslog configuration files
- have some basic network understanding
- have a basic understanding on how a firewall works and is configured under CentOS 7y
Setup
We will start by making minimal changes to /etc/rsyslog.conf. The default configuration already contains commented-out configuration bits that we can use for our needs:
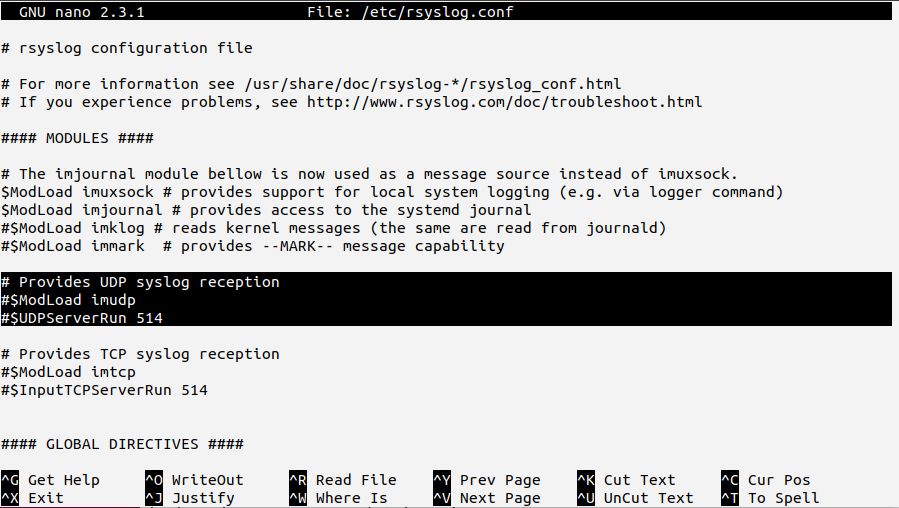
The selected text shows the basic elements you need to use to create the syslog server. In rsyslog terms, this is called a “listener”. If you uncomment these lines, you will create the necessary listener.
Note: in the default sample, port 514 is used. This is the official port assigned to syslog over UDP.
The CentOS default configuration unfortunately is provided in obsolete legacy format. As we have no more complex needs, we will still use it as-is for now. In the next lab, we will see which limits this format imposes.
To do the configuration change
- uncomment the lines
- save the configuration
- make rsyslog use the new configuration
Checking everything works
In order to ensure everything works correctly, you need to verify proper operation. The process to carry this out was already described in tutorial “rsyslog: configure TCP reception“. If you completed that tutorial successfully, you are invited to do the checking yourself (as a training experience). While doing so, keep in mind that the roles of LC and LR are now reversed. After that, continue to read to verify you did it correctly.
Checking should be done in two steps. We will use netcat for both.
Locally
Firstly, on the local machine (LC), connect via netcat and send a test “message” (we know that this is not a perfectly formatted syslog message, but we do not care now). Note that you need to add the -u switch to netcat to make it use UDP (TCP is used by default). Then, verify that it is recorded in /var/log/messages.log:

Your output should look similar to above screen-shot. If it is not, ensure that the configuration change was actually applied to /etc/rsyslog.conf and that rsyslog has successfully been restarted. Inside /var/log/messages you should see rsyslog’s startup message. Watch carefully out for error messages and correct them if there are any.
Remotely
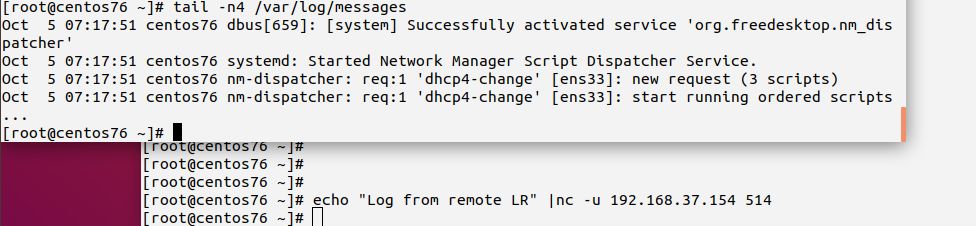
The second step will be carried out at the remote machine, this time from LR as we call it in this tutorial series. You basically do the same netcat command on LR, except that the target IP address is now the address of LC (or it’s name if name resolution is available). If you have an unaltered CentOS 7 install (as we assume), you may see an error message. Depending on circumstances (among other network configuration), you may also not see any failure indication. To be sure that the message was remotely received, check the messages file on LC.
Think a moment about what this means.
The issue is that the remote machine cannot connect to rsyslogd on LC. On the other hand, we know that rsyslogd runs properly on LC. We also tested that we can successfully connect to it locally. Consequently, the problem is somewhere in the network. For the lab setup, we can probably rule out real network connectivity issues. So the problem must be somewhere in system configuration.
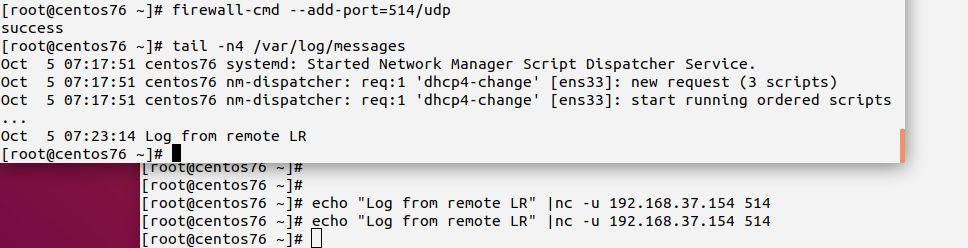
Remember the prerequisites? Yes, we said “firewall”. And, yes, this exactly is what gets in our way. Configuring rsyslog itself is not sufficient for the remote use case. We also need to permit remote systems to connect to it. To do so, we need to tell the firewall that traffic via port 514 over the UDP protocol should be permitted. Note: UDP is different from TCP. You need to enable each protocol separately.
In a real-world scenario you may want to add more precise rules, giving e.g. only a limited set of source IPs the permission to connect. For our tutorial use, we just permit any sender to reach LC. After this is done, you should be able to connect to LC from LR. Retry it.
If you still experience problems, do network troubleshooting. If you did not use port 514, be advised that CentOS 7 default SELinux policies permit rsyslog to listen to only ports 514. If you selected another port, you need to also permit that in SELinux. How this is done is outside the scope of this tutorial, but can be found in a Red Hat tutorial.
For those that follow closely…
If you followed the tutorials in order, think a moment about log files on LR. Will they be modified when we send the UDP message from LC to LR?
We configured LR itself as a syslog server (for TCP). We also configured LC to forward all messages to LR. In this tutorial, we did not make any provision to exclude messages from that forwarding rule. But we added the UDP server (listener). Consequently, any message incoming on LC is written to the local log files and also forwarded to LR.
Have a look at LR’s messages file. You should see your test message there as well. If it is not present, there is some issue with your setup. You should go back and run the check from the last tutorial again.
Side-note: if you suspended or rebooted virtual machines, they may have gotten a different IP address. If you used the IP address in LC’s config, you may need to update it.
Extra Check
You may already know that the procedure we used to configure the firewall only adds a temporary permission to the system. If you do not know this, we recommend to get some experience with this fact. To do so
- reboot LC and wait until it is fully started up
- retry sending a message from LR (via netcat)
- you should see the same error message again
- you can permanently fix the issue by adding “–permanent” to the firewall-cmd command
Make the change permanent, verify everything works and do another reboot. Retry sending the message again. This time it should work immediately. If not, double-check you did everything correctly and did not receive an error message.
Result
Both messages from the local system as well as messages received via UDP over the network will now be recorded into the local log files (and be forwarded to LR if you did the tutorials in order). Please note that what we did not does not split local from remote traffic. This is done in the next tutorial.